Mister Domestic invited me to his Aura Blog Party and I was like, "woaaaah.", and then saw the fabric and I was like, "woaaaah." and then it came to me that this would make the perfect pineapple quilt, "woaaahh..."
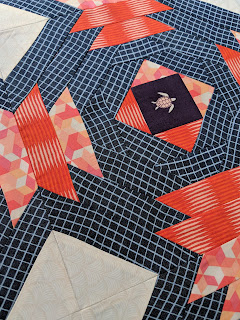
So this is my ode to Mr Crush Turtle, with turtles swimming through the denim water and geometric coral reef! A tropical blend of modern and traditional, this quilt is simultaneously structured and choatic. The clean lines of the pineapple blocks and the way I've placed the colours makes for a striking layout yet the prints themselves are scattered throughout in a random way.
I'm going to share some tips about making pineapple quilt blocks, why I used NO pins when piecing and (over)share the process of making my Pineapple Crush quilt!
It started with this selection of Art Gallery Fabrics:
solid: Pure Solids in Coral Reef
denim: Bombazine Inspired by AGF
prints: Hawaiian Honu in Dawn, Mua Loa in Coral, Tiki Way in Papaya and Loulu Fans in Sand from the Aura collection by Mister Domestic.
Pineapple blocks are a gorgeous traditional block that offers so many possibilities for creative layouts and I would definitely recommend proper planning. I found a basic diagram of the block and copied and pasted it ad nauseam to get a sense of the layout. At this point you should of course colour it in and plan but I didn't. It did help me visualise the effect I wanted but, being slightly impatient, I just took my idea and started sewing!
You can piece these blocks traditionally, use foundation paper piecing, a mix of the two or just completely improv. By far the neatest, easiest and most accurate method I've used is with the Creative Grids Pineapple Trim Tool.
It takes a little practice to get used to sewing the rounds and then using the tool to trim, sometimes with the angle and sometimes with the corner. It's labelled though and comes with instructions, so as long as you pay attention and count the rounds it's simple.
I made 36 x 10" blocks, they each have a few rounds and that's a lot of trimming and piecing. To make it a little quicker I did a lot of chain piecing and I highly recommend one of these thread cutters, which make it easy to cut the threads between pieces. Oh and use a good quality fine thread for piecing, I use Aurifil 50 weight in #2600.
It is also crucial to press your blocks as you complete each round before trimming, this way you get the most accurate finish. I used my handy pressing pad TheQuiltMate so that I could easily keep things moving (and didn't have to bother with the whole ironing board thing!).
The central blocks are all similar, with the denim as the background, coral prints as highlights forming little motifs and the cream fan print in the corners. This section was the most planned part of the quilt and I'm super pleased with the patterns it creates.
The blocks that form borders around the outside incorporate the Coral Reef solid and this is where it becomes more playful. I can't lie, at this point I realised I didn't have enough fabric to make them all consistent but nonetheless it works well. It frames the quilt nicely, sort of blending inwards and gives the whole thing more movement I think.
I didn't play about too much with the layout, I intentionally had the sea turtles facing all different directions because, you know, they're swimming!
I like to sew blocks into columns, then sew the columns together and finally the rows - this very early blog post demonstrates my method. I use my long pins to hold the blocks together and keep them in order as I move them to piece at the machine.
My husband snapped me in blogger mode, modelling my scrumptious hand knitted socks made for me by talented Tricia!
Did you notice I mentioned no pins when piecing?! Using the Trim Tool you don't have to be accurate with the piecing so that's easy but ordinarily I would pin at all the seams when sewing blocks together. I find with the angles of these blocks though it doesn't work so well (unless you use lots of pins but I hate them most of the time so no thanks). Instead, as I was sewing them together I literally just made sure that each seam was on top of the one underneath. This made it so simple and I really enjoy being tactile and using my hands to help me while I sew. Maybe that sounds weird but try it, you can manipulate the fabric quite easily and are all my seams totally perfect, no... but I had so much fun piecing this quilt top.
After my scramble net ad hoc piecing, the quilt top was complete and it was LOVE! I had moments of uncertainty, changing my plans and doubting it would work but in the end I was super happy with the quilt top and the corals and denim, with those fresh cream diamonds make me smile.
The top behaved itself too, all the pressing in between makes for neat seams, the final seams I did press open because it lessens the bulk and I had a quilting plan that meant bulky seams were a big no no.
I did spray the top and backing with some flatter before basting, this really does help keep it flat and makes basting easier. Also this yuzu scent is so nice and it doesn't make me gag like other scented starch alternatives can.
From the very beginning, as I put this design together, I knew I HAD to tie this quilt. It's the reason for the cream corners and I adore the softness of a tied quilt. I used #8 perle thread for the ties, with this same method to make the stitches.
I also knew though that it wasn't enough to hold the quilt together but no way was I tying those turtles, and tying any other areas on the quilt would have ruined the effect of the piecing. So I spent some time thinking about how to add some quilting. I knew I wanted it to be simple, both to keep the design and to keep the softness. And I wanted it to be modern. The clear winner for me was a grid, it also echoes the design on the denim and I like themes.
I have a stash of quilting thread and this variegated Mango YLI thread worked perfectly with the colour scheme. It blends beautifully, with little glimmers of yellow every now and again, like reflections! The quilting is a simple grid with the lines running between the motifs in the central part of the quilt. I marked them all with my hera marker, hands down the very best way for me to sew straight lines and it does work magically to help stop puckers. You can read my tutorial for that here.
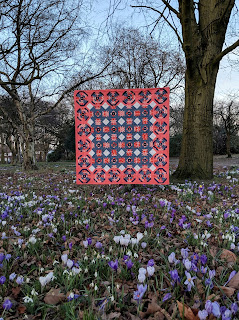
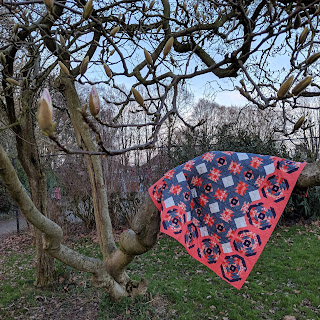
Quilt done... time to take it on an adventure. Unfortunately in Manchester there are no beaches, the only water is the ship canal or the Mersey - both beautiful in their own way but not likely a place for sea turtles. So instead we took it to a local park, where crocuses and budding magnolias set a pretty scene.
At 60" square this quilt will be a snuggly sofa one. The kids are each trying to call dibs on it already but since my husband loves tortoises and turtles I'm going to call it his.
Thanks for reading and I hope you found my quilt making process interesting!
For loads more fabulous inspiration check out the links below and party on 🎉
- Monday February 11: Amanda Woodruff of A Crafty Fox
- Tuesday February 12: Kylie Gersekowski of Little Moo Designs
- Wednesday February 13: Sharon Holland of Sharon Holland Designs
- Thursday February 14: Kim Niedzwiecki of Go Go Kim
- Saturday February 16: Sarah Maxwell of Fearless with Fabric
- Sunday February 17: Natalie Santini of Hungry Hippie Sews
- Monday February 18: Carolina Moore of Always Expect Moore
- Tuesday February 19: Isabelle Selak of South Bay Bella Studio
- Wednesday February 20: Elizabeth Chappell of Quilters’ Candy
- February 21-24: Intermission
- Monday February 25: Tara Curtis of Wefty Needle
- Tuesday February 26: Monica Tetteh of That’s Sew Monica
- Wednesday February 27: Nicholas Ball of Quilts from the Attic
- Thursday February 28: Lucy Brennan of Charm About You
- Friday March 1: Robbin Flockhart of Sew Farm Quilter
- Saturday March 2: Evie Jespersen of EV Quilts
- Sunday March 3: Kelly Liddle of Jeliquilts
- Monday March 4: Maureen Cracknell of Maureen Cracknell Handmade
- Tuesday March 5: HollyAnne Knight of String and Story
- Wednesday March 6: Mimi Goodwin of Mimi G Style
- Thursday March 7: Angela Wolf of Fashion Sewing with Angela Wolf
- Friday March 8: Kitty Wilkin of Night Quilter
- Saturday March 9: Sharon Burgess of Lilabelle Lane Creations
- Sunday March 10: Emily Dennis of Quilty Love
- Monday March 11: Sheri Cifaldi-Morrill of Whole Circle Studio
- Tuesday March 12: Elina Temmes of Elina Temmes
- Wednesday March 13: Jennifer Strauser of Dizzy Quilter
- Thursday March 14: Saija Kiiskinen of Saija Kiiskinen
- Friday March 15: Brittany Jones of Brittany J Jones
- Saturday March 16: Jodi Godfrey of Tales of Cloth
- Sunday March 17: Kim Niedzwiecki of Go Go Kim
- Monday March 18: Sharon McConnell of Color Girl Quilts


8 comments
Post a Comment
This is exactly why you absolutely deserved Designer of the year award, Thank you so much for all your inspiration and tutorials. Miss you on SQ, not long now till you return with your expertise and fun. X
Simply gorgeous! I am going to have to try the pineapple ruler now!
Very pretty pattern. I adore the sweet turtles. x
Wonderful job...beautiful quilt and pictures...congrats
Chaotic and Beautiful Aura Pineapples! I love those fussy cut turtles.
Your info ref no pinning with this block, got me reading more.
THank you. Oh yes and I love the Coral Pure Solid too
schimmel(dot)db(at)gmail(dot)com
That is so pretty! Thank you for sharing the process. I haven't made a pineapple quilt, but I might have to make one! It has been added to my to-make list!
no sea turtles in the Manchester ship canal? What on earth .... I love your quilt but must admit pineapple blocks are my nemesis. Some distant long dead relative of mine was an engineer on the Manchester ship canal. He was very short sighted in forgetting the sea turtles!
It's a wonderful quilt and that magnolia tree is probably starting to look fabulous now - shame your day wasn't a bit later on in the month :-)
I have the pineapple grid tool, so it was good to hear some tips around making blocks with them, although it is easy once you get going and the idea of the pale coloured corners for tying is great.