social media slump
31 December 2018
I am feeling pretty fed up with instagram and social media generally. Sure it can be really fun and there's a fabulous supportive community of quilters but the fast pace and option of just hitting like ❤ isn't cutting it for me anymore. There are so many photos, so many great accounts and just so much to see. I don't feel as much joy though. Too much of a good thing?
my last quilts
30 December 2018
I have two quilts that I finished recently, both made for Sewing Quarter. These are the last quilts I will make for them (for now at least) as I start something new. This one is the pretty Hot Air Balloon quilt pattern by Sarah Ashford.
giving and receiving homemade ♡
28 December 2018
Something wonderful happened, my best friends kids asked me to make them quilts. They really, really wanted quilts to snuggle with! The best kind of making is when you know the recipient is going to love it, use it and enjoy it.
This has been a long time coming but I'm so glad I took the time to create these quilts for her boys. They are simple, based on things they love and I had a lot of fun sewing them.
First is this Pokeball quilt, obviously because the elder boy likes Pokemon! For the central block I used the awesome pattern by Kelli of Seriously I think it needs stitches, from her Pokemon sew-along. I doubled all the measurements so the block finished at 40".
planning party
27 December 2018
I like writing lists. I write them a lot, about all sorts of things! It's become essential for me, lists give me focus and direction. I'm joining Quilting Jetgirl for the #2019planningparty and in this post I am outlining a list of plans for 2019. I'm trying to stay realistic with a hint of optimism, bringing back some much loved projects and joyful sewing. This is what I want to do...
endings and beginnings
24 December 2018

Today Sewing Quarter announced that my last show is on 28th December. That's because I have a new full time job starting in January.
that time I forgot to photograph a quilt
23 December 2018
It was bound to happen at some point. I completely forgot to photograph a quilt, therefore failing as a blogger. Thanks to the magic of screen grabs and YouTube though, I can at least show you the finished quilt (not quite in all its glory).
First let me share a pretty pincushion I made for Sewing Quarter. This is the Voodoo Feather Pincushion from the book Adventures in Paper Piecing by Sarah Elizabeth Sharp. I made it using fabric from a Tilda Bird Pond charm pack.
The book is excellent. It takes you through everything about foundation paper piecing, including how to make your own designs. The patterns are all fabulous, some of them with lots of small pieces but the results are totally worth it. I plan on making a pufferfish from the book for my daughter!
So the quilt (*sigh*) - I did manage to get one in progress shot as I was quilting it, so there's that!
This is probably one of the most traditional quilt blocks I've not made until now! That sentence is terrible, sorry. I love traditional quilt blocks but, quite honestly, flower baskets never really appealed to me. In this pattern though, on point with the lattice sashing, it looks more striking and modern.
The design is from the book Kaffe Fasset's Quilts in America, which is full of stunning photographs and could really be a coffee table book. The pattern is fairly simple, I made a smaller version of the quilt (without the border, which I did cut out but only realised I hadn't sewn on as I was quilting it!)
Here you can almost see the whole quilt...
This week has been so crazy, I'm madly trying to finish some handmade gifts. I have successfully made three quilts this week (one for work, two for gifts) - I was hoping to finish another but it's not going to happen because I have other work to do and not enough time! I'm proud of myself for accomplishing that though. There's still lots to do before Christmas and since I'm working on Christmas Eve it's probably all going to be totally last minute. Good job I work well with deadlines!
I will leave you with a funny still of me and John.
handmade : play : prepare
19 December 2018
Creativity has been on my mind recently. The role it plays it my life, the way I use it... or sometimes chose to ignore it. How different types of sewing/crafting affect me. Wondering "what do I get from creating/sewing/hand stitching?" and "is it (the act of making/the product) meaningful?".
My mind fills up with these types of questions and I try to unpick how I'm feeling, to work through some things and get to a place of inspiration, motivation and satisfaction.
One of the best things to do when I'm in that state of mind is to follow Cheryl Arkison's Morning Make practice. To create something just for the process. It doesn't have to be a finish because it's the play that is important.
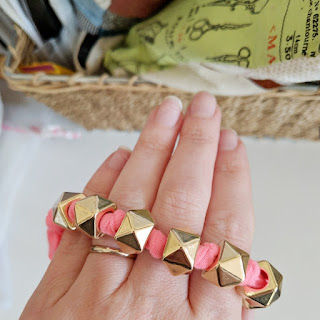
I had some neon pink jersey fabric (not sure why) and these beads, both from ebay and decided to make a key ring for myself. I had seen this key holder by Ina Seifart and thought I'd make my own version. A bit more rock and roll.
It was really calming; threading beads, knotting and creating.
catch up and 🐝 giveaway!
08 December 2018
*GIVEAWAY NOW CLOSED*
to save you some time, scroll down to the bottom if you're only interested in the giveaway 😶...
Everyone else, get comfy, grab a brew and I'll show you what I've been making recently!
First up was another lever arch file cover with some no drama llama EPP appliqué! I spent some time designing a pattern for the pieces that worked well with the fabric, the Llama Llama fat quarter bundle, for a demo on Sewing Quarter. I also decided to fussy cut the pieces making up the focal llama. Yes I could have used one big hexagon but I like to challenge myself a bit and it was for a small make, not sure I would do this if it was for a quilt because it's obviously more time consuming.
The great thing about using small pieces of epp like this is that you can use them for decoration and the apppliqué is really easy because the edges are already folded under. You can simple top stitch it in place or use any decorative stitch you like, I went for a small zig zag. The file covers are so fun to make and are great gifts. I also like anything that lets me combine my love of stationery and sewing!
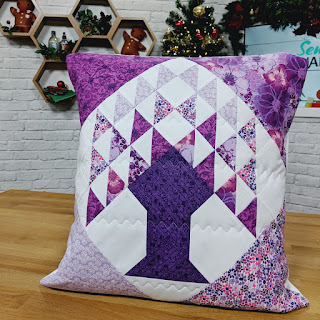
I also made my Tree of Life quilt block into a cushion, using the Purple Mist fat quarter bundle. The finished 14" block is set on point with side setting triangles. I tend to always cut these larger and then trim them back. It might waste a tiny bit of fabric but it's easier to be more accurate that way and you don't have to worry about the bias edges too much.
There are lots of half square triangles (hsts) in this block but the cutting is much quicker with the Creative Grids Multi Size 45°/90° Triangle ruler. It also means you can sew them together quickly and with more accuracy. I use the ruler whenever I have to make lots of hsts, I definitely recommend it. For the quilting I used a fun wavy decorative stitch on my Elna 680 machine (mode 2 #1).
This week Pantone announced the colour of the year for 2019, Living Coral. I absolutely love it, it's such a warm and lighthearted colour. My favourite colours are pink and orange and in the past couple of years I've found myself buying lots of peach and coral fabric, it's a lovely mix of the two. I am hoping this means they'll be even more coral fabric available and coral everything because the colour makes me very happy!
Our local library reopened recently, after some renovations, and I am delighted to be getting back into reading. Books have always been a great way for me to escape, immersing myself in a story and also as a way to learn more or think about things differently. I admit to being a fan of business and self help books, I go through phases of reading them (not all of them, I'm kind of picky) and I have to be in the right mood. This is one of the books I borrowed, We: A Manifesto for Women Everywhere by Gillian Anderson and Jennifer Nadel, so far I'm enjoying it (and yes it is that Gillian Anderson). It has a gentle, conversational approach with anecdotes and exercises.
I also borrowed a fiction book, Clock Dance by Anne Tyler. A few years ago I read a couple of her books and enjoyed them so I'm looking forward to this one. If you have a favourite title of hers please let me know, I like recommendations!
The staff at Patchfinders had a get together this week and we learnt to make fabric lanterns. Our teacher Lil was great - she will be teaching a class at the shop in the new year - and we had such a fun time. A huge thank you to Claire for organising such a wonderful evening!
I chose two of my favourite prints, Social Climber from Floral Retrospective by Anna Maria Horner and the Viewfinders by Melody Miller. There is no point keeping fabric treasures tucked away and I love that I'm going to be able to see these beautiful prints in my living room. Judith very kindly let me use some of her pom pom trim to embellish my floral lantern. I think it's so kitsch and granny looking but still modern - so my taste!
And lit up with battery fairy lights inside, they are so pretty! Very hard to capture but you get a sense of it here. The one on the right isn't quite finished, I still need to tuck the seam on the inside.
On to the giveaway...
I began using beeswax when I started doing English Paper Piecing, I was given a small piece to run thread through. It helps prevent knots, allows for smooth sewing and strengthens the thread. After I started using Aurifil for EPP, I found I didn't need the beeswax and subsequently lost that small piece somewhere. At a local market I discovered Foz-Bees, a Manchester bee keeper who has the most amazing products and delicious honey. The beeswax blocks called out to me and I thought it would be fun to try it with other threads, I have heard it works well for those sometimes pesky metallics! I'm wondering if I can use it on embroidery thread (if any one has please let me know your experience!) and fine thread like the Aurifil 80wt that I use for appliqué. I'm always keen to try new and old techniques, especially when it's with natural resources - even better when you can shop small.
I picked up some extra and am giving away this 100% natural beeswax block and bee.
The clouding you see on it is because I've been keeping it in the fridge! Due to the fact that it's fairly delicate, could possibly melt if it was near a heater, postage costs are crazy, and I'm not certain of international restrictions on this sort of thing: I am only offering the giveaway to UK readers.
*GIVEAWAY NOW CLOSED* Congratulations to the winner, Kay!
TO ENTER THE GIVEAWAY
Just leave a comment below - if you're stuck for something to write, tell me your favourite way to eat honey! Mine would be in porridge or to just eat a teaspoon of it!
If you don't want to sign in to a profile please leave your email in the comment, e.g. ilovebees (at) honeycomb dot com so that I can contact you.
UK entries only, the winner will be chosen on Monday 10th December. Good luck!
Little Quilt needle case tutorial
07 December 2018
For those times when you want a quick little make, a handmade gift, or need a needle case! Here's my tutorial for the Little Quilt needle case, so named because that's what it is like (with a bit of felt!). The finished needle case measures 3" x 4". If you need to store more needles and have a handy way of organising them, may I suggest the Stitchy Pie needle case pattern available in my shop.
You can go to town or keep it really simple and you can whip these up so quickly, you will want to make more! I made one version for me and another to give a friend in a swap.
To download / print the PDF instructions for the Little Quilt needle case, CLICK HERE
YOU WILL NEED
Outer fabric: 6½" x 4"
Inner fabric: 6¼" x 4"
Fusible fleece or wadding: 6½" x 4"
Felt: 4½" x 3"
Binding: approx. 25", cut 2" strip
Hera marker or fabric pen/pencil
A popper / snap - either a press in or sew in snap
TUTORIAL
1. Fuse fusible fleece to the back of the outer fabric. If you are using wadding you may want to use a lining fabric and make a 'quilt sandwich'.
2. Quilt as desired. You can quilt by machine or hand, or add some embroidery stitches as I did below (ignore the line of stitching down the middle, we will come to that!).
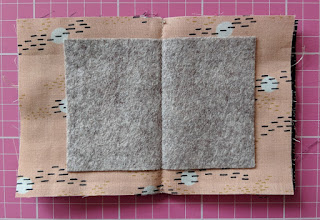
3. Place the quilted outer fabric right side down, put the inner fabric on top right side up and the position the felt in the centre. Mark a vertical line down the centre using a hera marker or fabric pen/pencil. Stitch on the line.
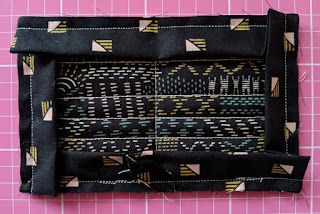
4. Attach the binding to the front using a ¼" seam allowance, I have a basic tutorial for binding here.
5. Fold the binding over to the inside and hand stitch the binding down (or machine stitch if you prefer).
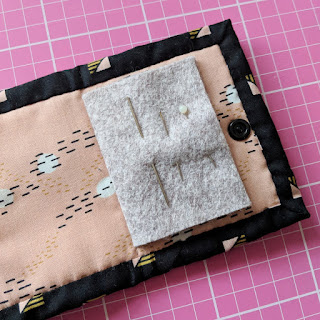
6. Position and attach the snap in the centre of either side, next to the binding. Put with the 'male' stud on the front side and the 'female' socket on the back. It helps to push the cap part (with the point) through the front and then close the needle case and press, so you have a mark to position the socket and they will align when you close the case.
Load it up with needles and/or pins and you're finished!
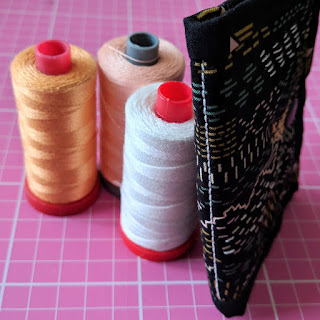
This is a great project to experiment with different threads, I used Aurifil 12wt and 28wt for both the hand stitching and the 'spine'. I think metallic threads would be fun too!
This needle case is for my beading and tassel making needles, it's nice to keep them separate from my regular sewing needles.
The fabrics I used are from Faraway Places by Elizabeth Olwen for Cloud9 Fabrics, for UK stockists visit Hantex.
Happy stitching!
TheQuiltMate
26 November 2018
It is wonderful to find a product that is useful, very well made and solves a problem. TheQuiltMate is a completely different type of ironing pad - something I think quilters could get really excited about. I have teamed up with TheQuiltMate to be able to offer you a discount code, a giveaway and to share my honest thoughts on their product. I will tell you straight away that it's really great!
new 💌 pink bambi!
23 November 2018
I'm posting this on a day when everyone goes % sales and shopping mad. I've actually not bought anything today (except ice cream!) because I'm pretty sure this lovely lot will keep me busy, along with the rest of my fabric stash.
First are these pretty prints from Rose Garden Patchwork, a brilliant UK site to shop for Japanese prints and notions.
clockwise from top left: Pretty Cards in Lilac by Yuwa; Paper and Marguerite by Suzuko Koseki and Fashionable Cat - Sobakasu Kids, I was also kindly sent a bit of Fruit Love by Atsuko Matsuyoma with my order.
Next up is one metre of Essex Yarn Dyed Metallic in Sorbet from Sew Hot, which I ordered for a specific project... and now I don't remember what!! It is super pretty through, shot through with blue, pink and yellow metallic strands.
The new and upcoming collections from Tilda really are beautiful, I always like the colours they use and when I saw they had some basics I couldn't resist ordering from Sew and So. I bought the medium dots, which I think will be a great blender and would also make a lovely binding fabric.
This isn't at all sewing related but as I occasionally document my life here too I wanted to share the new tattoo I got last week. It's been one I planned for some time and I finally found an artist I wanted to do it. I contacted Alex Fraser and he custom designed my tattoo with everything I wanted in it! The flowers all have personal meaning for me, the anchor is for my faith and 'mutiny' is a reminder of the brilliant manifesto in the book Be More Pirate - which I highly recommend reading, very thought provoking! He works at Tooth and Talon Tattoo in Manchester, it was such a good atmosphere in there and a completely enjoyable experience.
Back to more sewing stuff, today was a good post day! The latest Signs of the Sewdiac subscription box arrived, probably my favourite design so far - so pretty and hand sewing is my favourite thing! The notebook is gorgeous, with dot grid paper, another beautiful pin, sticker, card and a pen. Some starry bias binding too, which I know will be useful!
And this little cutie arrived! I ordered it from Etsy, sold as a vintage planter - obviously now destined to become a pin cushion. I just have to find the perfect fabric...
I love it's face. The nice shade of pink and the gold accents. Also the sweet birds on the pot, totally reminds me of Bambi. Which is what I was calling it but then is it more Faline (the doe in Bambi)? It doesn't have to be a girl because it's pink does it. I like both names, I'm still undecided!!
It's all go preparing for a busy weekend. We've got the middles birthday, a print fair and a family get together. If you happen to be in Manchester this weekend, come and say hello - look for Prints of Cats.
I hope you have a great weekend what ever you are up to!
Pineapples and Paris Star quilt
14 November 2018
It's been sew sew sew at my house! These projects each have a lot of seams and used up a lot of thread. Completely worth it though because they turned out really nicely.
My first project used the new Bird Pond collection in Blue and Teal by Tilda. I made two sizes of pineapple blocks for a 20" cushion front (which I did make into a cushion but I don't have a picture of the finish!). I chose to fussy cut the gorgeous Anemone print for the centre of the largest block and for the corner squares.
Surrounded by smaller blocks like this, it looks like ripples on a pond. The blocks were made using the Creative Grids Pineapple Trim Tool, both the larger (for the 10" centre block) and mini version (for the eight 5" blocks). It makes it so easy to create really accurate, straight seams for what is otherwise a fiddly block. Someone messaged the show to ask if you could foundation paper piece these blocks, of course you can and a quick google search showed up plenty of free patterns you can use. Personally I prefer using the tools, it really is so simple once you get in the swing of it - just be sure to follow the instructions! I have made errors myself though those blocks still turned out nicely, they just weren't pineapples! I also think this is a brilliant way to use up scraps and like that you can create so many different layouts playing with fabric placement. You can see my 'mistake' blocks and another version of the block I made during the demo, video at the end of this post.
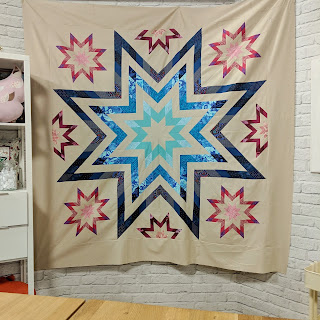
My other project is a quilt top made using the fabulous Paris Star pattern by Lynne Goldsworthy. This is such a stunning design and Lynne's instructions are excellent as always. I really like those half stars and the way they disappear into the border. It's a fairly big quilt finishing at 70" but the piecing isn't complicated.
Here is lovely Vicki (and her beautiful princess hair) with a ta da moment after director Tim did a great job of hanging the quilt top in the studio. Not as easy when it's a flimsy that's larger than the angled wall!
There are lots of points to match while making these stars but I showed a couple of tips during the demo that should help. The four blocks that make up the quilt come together fairly quickly and the borders are simple, perfect for some fancy quilting if you wanted to. This is definitely one of those designs that looks slightly terrifying but once you've made it you want to make another!
If you'd like to see the demos click below - the Pineapple cushion starts at 1:05:00 and the Paris Star starts at 3:04:00 - you could watch the whole show and see Becky Alexander Frost demo bag making!
Subscribe to:
Posts (Atom)


